Automate Subnet Discovery With Infoblox IPAM API - Part II
A simple way to ensure continuous visibility in your network

This article is the second part of my article presenting how to use the Infoblox IPAM api, WAPI, to solve a specific issue: the lack of awareness of network changes in an infrastructure. It presents:
- The requirements
- How to form request to get the list of all subnets using WAPI
- The logic used to identify change in the network (addition or removal of subnets)
- The email sending component, upon change.
The code for the solution is available on GitHub

Requirements
- A server that has network access to IPAM’s management service
- A dedicated service account that will authenticate to WAPI
- No database, even in memory db, will be used. We are keeping it simple here by using CSV files and the python pandas library to be able to parse them. If deployed in an environment, it may be preferred to use an in-memory db such as sqlite3
The list of python packages required can be found in the requirements.txt file.
Important note: I created this script when python 2.7 was still maintained. It is highly recommended to upgrade to python 3.
Authenticate
I use the requests package to authenticate to IPAM, save locally the session cookies to be able to reuse it in subsequent requests, or capture any error.
| |
Note that verify is set to False, which accepts any TLS certificate presented by the server, and will ignore hostname mismatches and/or expired certificates. This should be used only in dev environment.When the script is deployed, you should use the default verify behaviour, that will throw an SSLError when the certificate can not be verified.
See the documentation on how to use
the verify flag with locally stored certificates or CA bundles.
| |
Upon success, the session cookie is saved for subsequent requests. ibapauth is the WAPI provided cookie for this purpose that we retrieve from the response.
| |
Get the list of subnets
https://<IPAM-URL>/wapi/v2.7 is the base URL to make API requests. The endpoint to obtain a list or detailed information about networks is network.
In IPAM, it is possible to group all subnets from a parent network in a network container entity.
For example, the parent network 192.168.0.0/16 can be a network container, that will store the reference to its subnets, such as 192.168.0.0/17 and 192.168.128.0/17.
These referenced subnets will not be accessible through the the network endpoint.
Consequently, the script first passes through and stores each network container using the network_container endpoint. The response contains a list of reference to networks.
Then, the scripts gets the subnets by iterating through each network_container and obtaining the list on child networks. This is done via the network endpoint, by providing the network_container as a param.
For example, network?network_container=192.168.0.0/16 will return all its child networks.
The request parameter _return_fields can be set to choose what fields (how much information) will be returned from each request.
Detect change in the network: addition or removal
Introducing the pandas library
We store in memory the list of subnets obtained in a pandas dataframe. This data structure is in some regards similar to an excel table,
it is a table-like structure with a rich API that allows manipulating columns, rows an individual cells.
Furthermore, it supports reading hash-value data structures and transform them to dataframes.
By the way, when we made the API call to fetch subnets, we obtained the response in a JSON format, and created the dataframe from it using the read_json method.
Pandas also supports exporting the table in different formats, such as CSV or HTML.
The library is widely used and is well maintained, thanks to its popularity in the machine learning industry. I first learned to use some of its features during a university machine learning course, and wanted to reuse it because it is like a swiss army knife tool for manipulating datasets.
Detecting change via an SQL join like operation
I use the merge method for dataframe comparison. This method is similar to a join operation in a database
This article explains very well the different ways to perform merge operations.
The operation we are looking for should keep all of the original rows from both dataframes, X and Y, with an indication that a particular row belongs to X only, Y only, or both tables:
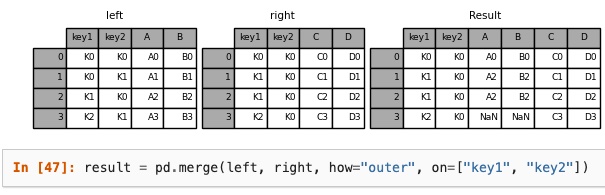
| |
- The parameter
how = outerindicates to use the union of they keys (network) from both dataframes. This, it enables us to keep all of the rows from both tables. indicator=Trueadds a column (by default, named_merge) to the resulting table indicating if the row is present inX,Yor both tables.
We can now indicate whether there was a change or not by looking at the _merge column, depending on the value for each row:
left_only(present in the old table,Xbut not in the new one,Y) informs that the associated subnet is not present anymore, it was removed from IPAM, which is a strong indication that it was removed altogetherright_only(present inYbut notX) shows that a subnet was added, as it was no present inXbothindicates that there is no change. It is the most common value in practice.
All the rows from the resulting table where _merge != both can then be extracted ad saved on another dataframe.
If there is at least one row verifying this check, there is a change in the network.
In parallel, the list fetched from the current script run
will be exported as a CSV file, and used as a comparison basis for next time it will be executed.
Send email
We use the email package to construct and send an email to given recipients. The file smail.py contains the code for it.
Pandas supports transforming dataframes to HTML content via the to_html method, creating simple HTML tables.
In addition, most corporate environments have an SMTP mail server that handles delivering emails originating from servers.
The python package smtplib facilitates communicating with these servers. We only need to connect to it, and send the email. The mail server will be responsible for parsing the mail headers, extracting the recipients mail and delivering it.
| |
Lastly, a quick note about when to execute the script. It should be done on a periodic basis (daily, or weekly). This can be configured via a cron job configured on the server where the script will be executed from.
As a conclusion, in this post, I provided details about my simple solution leveraging WAPI and the pandas library.
I hope this post will be helpful to anyone facing a similar issue in an Infoblox managed network.